Docker Container方便建立系統備份,隨時可以啟動服務,來demo完整系統。甚至可以在一部機器 (多核心CPU + 大量記憶體) 執行多個輕量化虛擬化系統服務。但是container執行幾周後 (e.g. crawl web pages and extract metadata),系統會記錄logs導致container image過大。
 |
| Original image size = 648.5 MB |
有關container介紹,請先看:
QNAP - QTS 4.2 Container Station (Based on LXC and Docker)
可以用以下指令,檢查目前images/containers資訊。
docker images # loaded images
docker ps # running containers
docker history image_name:version_number # historical commands on the image
 |
| docker ps: One image creates three containers for crawling different domain web data. |
Running container可以用以下指令,建立目前整個系統狀態備份,方便隨時轉移到其他機器部屬執行。
docker commit -p -m "版本訊息" -a "開發註解" container_name image_name:version_number # 備份前,先commit
docker save -o image_ver.tar image_name:version_number # save container as new image version
 |
| The container was stopped while committing (docker commit -p) |
Commit之後,從docker CLI指令看,還是由Windows檔案來看,都比原來images大了許多倍。等於抓取的資料 (都放在PostgreSQL資料庫) 應該佔了超過3.5 GB?這樣對嗎?那備份containers就很浪費空間。
 |
| Committed images size is about 4.2 GB |
 |
| The size of saved container (as a new image version) was increased from 650 MB to 4.2 GB. |
到Linux VM檢查 (原VM系統共20 GB),建立3個containers,crawl web data一陣子之後,已經用了48%的空間。多執行幾個月,空間就不夠了。
 |
| Command line interface of Linux VM started by Virtual Box |
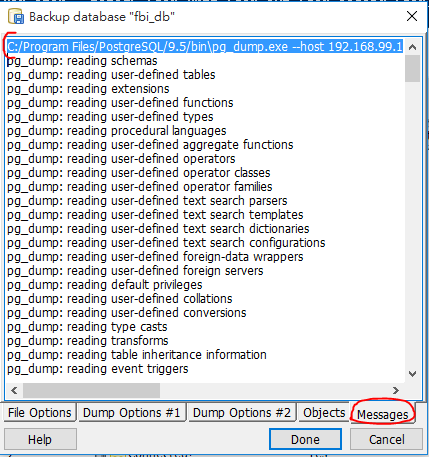
所有抓取的web data都存在PostgreSQL資料庫,先備份看看用了多少空間。利用安裝在Windows的PgAdmin III (來自安裝好的PostgreSQL),透過圖形介面操作,在要備份的DB按右鍵 > 選Backup。備份記得選 "
Format = Tar",備份完成記得到message複製指令如下,這樣就可以清楚該用甚麼指令自動備份 (寫在.BAT,並設定排程)。
"C:/Program Files/PostgreSQL/9.5/bin\pg_dump.exe" --host 192.168.99.100 --port 5499 --username "db_user" --no-password --format tar --blobs --verbose --file "C:\DB\filename.backup" "db_name"
 |
| Backup with TAR format |
 |
| Backup successfully! Click "Message" to get the backup command |
備份完發現,DB僅約1.05 GB,遠低於container多出原來image的3.5 GB。因此,
備份整個container成為新的image並不是好作法。
 |
| 1.05 GB |
若能由原來的image以指令建立該container於新機器,再由指令還原DB,那可以省去大量空間。同樣,先以pgAdmin III操作GUI還原,並設定以下選項。注意選項【set "
Clean before restore" ON】,因為原來DB可能建立時,有初始化DB資料數筆,直接restore會導致Primary Key或UNIQUE Constraint的衝突。
"C:/Program Files/PostgreSQL/9.5/bin\pg_restore.exe" --host 192.168.99.100 --port 5499 --username "db_user" --dbname "db_name" --no-password --clean --verbose "C:\DB\filename.backup"
 |
| 還原選項:set "Clean before restore" ON |
還原成功後,copy&paste "Messages" TAB內的指令,以便能以批次檔設定成還原指令。
 |
| pgAdminIII: 用GUI還原資料庫,已取得正確的還原指令。 |
改用到新的機器改用指令還原會出錯,原因在於no pasword選項。
 |
| "no password option" needs the database registered by pgAdminIII. |
用 pgAdminIII建立資料庫連線的註冊資料,就可以正確執行以上指令。
這樣就可以自動backup/restore containers,配合指令迅速在其他機器建立和執行containers。


No comments :
Post a Comment